One or more elements have become highly distorted. Excessive distortion of elements is usually a symptom indicating the need for corrective action elsewhere. Try incrementing the load more slowly (increase the number of substeps or decrease the time step size). You may need to improve your mesh to obtain elements with better aspect ratios. Also consider the behavior of materials, contact pairs, and/or constraint equations. If this message appears in the first iteration of first substep, be sure to perform element shape checking.
The above message is often observed when elastic-plastic material properties are defined within the model. The error message explains itself quite well. In itself it is a representation of the numerical (mathematical) behavior of the model and may or may not be representative of real world phenomena. One may adopt a step by step process to get to the bottom of the issue:
- Check the maximum stress in the model at the last converged time step. Compare this to the yield stress and ultimate stress as defined on the stress-strain curve within ANSYS – If the observed stress is above the yield stress and /or close to the ultimate stress, then this indicates that the component probably is approaching or is at plastic collapse. Depending on other factors one may or may not be able to squeeze much more out of the model – i.e the model may be at or very close to the maximum load that it can take under the defined loads and boundary conditions.
- Verify that the model behavior is realistic. It is possible that the element distortion is a result of poorly defined boundary conditions, loads or contacts. For example, a contact pair that should be allowed to slide may be defined as bonded. As a result, the rigidity at the contact pair may be preventing sliding, and resulting in artificial distortion of elements, and fictitious plastic strains.
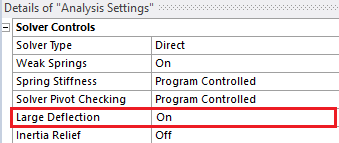
- Make sure large displacements are turned ON. The mechanical stiffness of the model is a function of material properties, contacts and geometry. Non-Linear geometry or large displacements refer to that aspect of the model which accounts for changes in model stiffness due to geometric changes. As an example, thing of a spring – The more it is stretched the stiffer it gets. In other words, the spring stiffness is clearly related to its geometry. The same can be said for other geometries. However, for structural analysis, if displacements are “small” their affect on stiffness is minimal and ignoring geometric non-linearity (NLGEOM) is acceptable. But if we are dealing with plasticity, then ignoring NLGEOM can result in erroneous results and / or convergence difficulties. The large displacement setting can be found other “Analysis Settings” as shown in Fig 1.

4. Modify the mesh. Sometimes refining the mesh in the problem area fixes the issue. Some ways to refined the mesh are: 1) Change element sizing, 2) Change element order (linear / quadratic), 3) Change element type (Tetrahedral vs Hexahedral) 4) Use surface meshing 5) Use slices for better mesh transition etc. Often times a combination of the above methods would efficiently result in a mesh which lets you get over the convergence
5. Apply the load more “slowly”. For transient analysis, time is a physical phenomenon that is modeled within the analysis. In a steady state (static) structural model there is no time, but we do have what we may call “numerical time”. The load steps within the model are often called time steps. We can choose to apply the load in multiple time steps to help with convergence difficulties. Instead of applying a load in “one shot” we can apply the load incrementally.
See Fig 2 below. We can define the time steps as shown. The initial time step is 0.10 which means that the model will initially try to solve for 0.1*Total load. If this doesn’t work then the algorithm has the option to “bisect” – i.e drop the factor to as low as 0.05 (Minimum Time Step). If convergence is not achieved at minimum time step, the solution will crash with an error message

6. Increase the maximum number of equilibrium iterations. In step 4 we mentioned bisection. At what point the model decides to “bisect” is a function of the number of equilibrium iterations defined for that Time Step. Equilibrium Iterations refers to the maximum number of iterations the model will attempt to reach a converged solution at a give load. By default, this is set to 26 within ANSYS. It is possible to increase this. I often change this to 50 to allow the model more iterations before it finally decides that it needs to do a bisection. In Workbench, the maximum equilibrium iterations can only be changed by adding an APDL command snippet under “Static Structural”, or where the loads are defined.
NEQIT, 50
The above command would set the iterations to 50. This can be confirmed by checking the solve.out file where you should see the following text:
USE A MAXIMUM OF 50 EQUILIBRIUM ITERATIONS EACH SUBSTEP
7. Use Linear Material Properties. This should usually be a last step and should only be used if all else fails and/or the localized stress/strain response in the problem area is not relevant to the overall objective. This can be achieved in a number of ways. Sometimes, I slice the component in the region of interest and assign linear material properties only to the small slice. One can also create a named selection and assign linear material properties to the named selection using a command snippet.
I hope this article would help the readers in overcoming convergence difficulties. If you are having a specific issue, feel free to ask a question under comments, and I will try to help.